- MSMQ Message Queueing in Compact Framework (part 1)
In this tutorial, we write a simple MSMQ application for a Windows Mobile device. The application automatically installs the MSMQ service if it's not already present. A simple interface is provided to let the user send and receive messages via MSMQ.
MSMQ is a Microsoft message queueing technology that allows disparate applications, not necessarily running in the same machine, to send messages to one another. Part of this store-and-forward technology is a failsafe mechanism to ensure guaranteed delivery (well, to an extent). Message priorities can also be set as well.
One of the strongest competitors to Microsoft, in terms of providing message queueing middleware, remains to be IBM, which offers the product called WebSphere MQ (previously called IBM MQSeries).
This tutorial is based on Mark Ihimoyan's posts in his excellent blog.
Categories: [MSMQ_] [Networking_] Tags: [netcf2] [Compact Framework] [MSMQ] [Networking] Read more...

MSMQ is a Microsoft message queueing technology that allows disparate applications, not necessarily running in the same machine, to send messages to one another. Part of this store-and-forward technology is a failsafe mechanism to ensure guaranteed delivery (well, to an extent). Message priorities can also be set as well.
One of the strongest competitors to Microsoft, in terms of providing message queueing middleware, remains to be IBM, which offers the product called WebSphere MQ (previously called IBM MQSeries).
This tutorial is based on Mark Ihimoyan's posts in his excellent blog.
- As usual, start Visual Studio and create a new smart device project.
- In Solution Explorer, right-click on References, and add the reference to System.Messaging component. We need this reference as we are using the Messaging classes later.
- Change the form property MinimizeBox to false, so that the use can close the application easily.
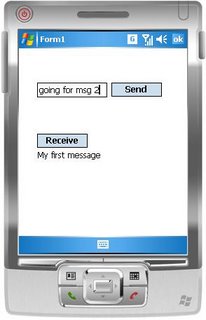
- Add a TextBox, 2 Buttons and a Label to the form, naming them txtSendMsg, btnSend, btnReceive and lblReceiveMsg respectively. The first button lets the user send the message in the textbox to a message queue. The second button receives a message from the queue. Even if the user closes the application, the stored messages in the queue remain intact and can be received when the application is restarted (however, a soft reset clears the queue).
- Next, we want to make the application self-contained, in that it will check for the presence of the MSMQ service and automatically installs it if it is not detected.
- Go to Microsoft Mobile Development Center and follow the link "Redistributable Server Components for Windows Mobile 5.0" to download the package. We need the msmq.ARM.CAB file in the package.
- After downloading, extract the msmq.ARM.CAB file (under msmq folder in the downloaded package). This is the cab file that installs the MSMQ service in the device.
- Back in Visual Studio, right-click on your project in Solution Explorer and add msmq.ARM.CAB to your project (use Add-> Existing Item...). Then click on msmq.ARM.CAB in Solution Explorer and change its "Copy to Output Directory" property to "Copy if newer". This will ensure that the cab file is copied over to the program folder in the device.
- In your form code, import the namespaces:
- Then within the form partial class, add the following declarations needed to P/Invoke the CreateProcess Win32 function. We need to call CreateProcess to install the cab.
- In the Form Load event handler (remember to generate the event handler stub by double-clicking on the form in design mode; similarly for the button click event handlers later), enter the following code which checks for and installs the MSMQ service.
- In the btnSend click event handler, enter the following code to send a message to the "testq" queue.
- Finally, in the btnReceive click event handler, we will receive the frontmost message in the "testq" queue. Note that we are setting a simple timeout of 1 second (so the UI is not blocked for too long) in case there isn't any message in the queue.
- We are done! Deploy and run. The first time you run, there is quite a long delay on form load, as the application is invoking wceload.exe to install the MSMQ service. When the form is loaded, type something in the textbox and click the Send button. Send a few more messages. Then click the Receive button a few times.
- Try closing and reopening the application and test if sent messages are still receivable. What about the effect of doing a soft reset?
using System.IO;
using System.Messaging;
using System.Runtime.InteropServices;
public class ProcessInfo
{
public IntPtr hProcess;
public IntPtr hThread;
public Int32 ProcessId;
public Int32 ThreadId;
}
[DllImport("CoreDll.DLL", SetLastError = true)]
private extern static
int CreateProcess(String imageName,
String cmdLine,
IntPtr lpProcessAttributes,
IntPtr lpThreadAttributes,
Int32 boolInheritHandles,
Int32 dwCreationFlags,
IntPtr lpEnvironment,
IntPtr lpszCurrentDir,
IntPtr lpsiStartInfo,
ProcessInfo pi);
[DllImport("CoreDll.dll")]
private extern static Int32 GetLastError();
[DllImport("CoreDll.dll")]
private extern static
Int32 GetExitCodeProcess(IntPtr hProcess, out Int32 exitcode);
[DllImport("CoreDll.dll")]
private extern static
Int32 CloseHandle(IntPtr hProcess);
[DllImport("CoreDll.dll")]
private extern static
IntPtr ActivateDevice(
string lpszDevKey,
Int32 dwClientInfo);
[DllImport("CoreDll.dll")]
private extern static
Int32 WaitForSingleObject(IntPtr Handle,
Int32 Wait);
public static bool CreateProcess(String ExeName, String CmdLine)
{
Int32 INFINITE;
unchecked { INFINITE = (int)0xFFFFFFFF; }
ProcessInfo pi = new ProcessInfo();
if (CreateProcess(ExeName, CmdLine, IntPtr.Zero, IntPtr.Zero,
0, 0, IntPtr.Zero, IntPtr.Zero, IntPtr.Zero, pi) == 0)
{
return false;
}
WaitForSingleObject(pi.hProcess, INFINITE);
Int32 exitCode;
if (GetExitCodeProcess(pi.hProcess, out exitCode) == 0)
{
MessageBox.Show("Failure in GetExitCodeProcess");
CloseHandle(pi.hThread);
CloseHandle(pi.hProcess);
return false;
}
CloseHandle(pi.hThread);
CloseHandle(pi.hProcess);
if (exitCode != 0)
return false;
else
return true;
}
string MSMQ_ADM = @"\windows\msmqadm.exe";
if (!CreateProcess(MSMQ_ADM, "status"))
{
if (!File.Exists(MSMQ_ADM) ||
!File.Exists(@"\windows\msmqd.dll") ||
!File.Exists(@"\windows\msmqrt.dll"))
{
//install msmq
string _path = Path.GetDirectoryName(System.Reflection.Assembly.GetExecutingAssembly().GetName().CodeBase);
string docname = _path + "\\msmq.ARM.CAB";
CreateProcess("wceload.exe", "/noui \"" + _path + "\\msmq.ARM.CAB\"");
}
//check again
if (!File.Exists(@"\windows\msmqadm.exe"))
{
MessageBox.Show("failed to install msmq cab");
Close();
}
else //register, start and activate service
{
CreateProcess(MSMQ_ADM, "register cleanup");
if (CreateProcess(MSMQ_ADM, "register install")
&& CreateProcess(MSMQ_ADM, "register")
&& CreateProcess(MSMQ_ADM, "enable binary"))
{
IntPtr handle = ActivateDevice(@"Drivers\BuiltIn\MSMQD", 0);//device registry key
CloseHandle(handle);
if (CreateProcess(MSMQ_ADM, "status")) return; //success
}
MessageBox.Show("failed to start msmq");
Close();
}
}
if (txtSendMsg.Text.Trim() == "") return;
string strDestQ = @".\private$\testq"; //queue name
try
{
if (!MessageQueue.Exists(strDestQ))
MessageQueue.Create(strDestQ);
MessageQueue mq = new MessageQueue(strDestQ);
mq.Send(txtSendMsg.Text);
txtSendMsg.Text = "";
}
catch { }
lblReceiveMsg.Text = ""; Refresh();
MessageQueue mq = new MessageQueue(@".\private$\testq");
//set formatter for deserializing message
mq.Formatter = new XmlMessageFormatter(new Type[] { typeof(String) });
try
{
Message messageReceived = mq.Receive(new TimeSpan(0, 0, 1));//timeout in 1s
lblReceiveMsg.Text = (string)messageReceived.Body;
}
catch { lblReceiveMsg.Text = "- timeout -"; }
Categories: [MSMQ_] [Networking_] Tags: [netcf2] [Compact Framework] [MSMQ] [Networking] Read more...
Permalink
posted 11:36 AM
30 comments
![]()
![]()