New to compact framework tutorials? Learn to write your first compact framework application here.
Zac Efron - Hairspray star and Mythbusters' Kari Byron at Celebrity Treat. Check out income and career information in Singapore.

Saturday, January 07, 2006

- MSMQ Message Queueing in Compact Framework (part 1)
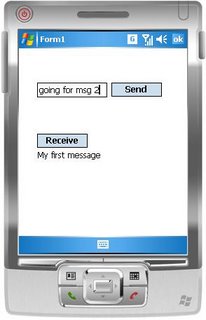
In this tutorial, we write a simple MSMQ application for a Windows Mobile device. The application automatically installs the MSMQ service if it's not already present. A simple interface is provided to let the user send and receive messages via MSMQ.


MSMQ is a Microsoft message queueing technology that allows disparate applications, not necessarily running in the same machine, to send messages to one another. Part of this store-and-forward technology is a failsafe mechanism to ensure guaranteed delivery (well, to an extent). Message priorities can also be set as well.

One of the strongest competitors to Microsoft, in terms of providing message queueing middleware, remains to be IBM, which offers the product called WebSphere MQ (previously called IBM MQSeries).

This tutorial is based on Mark Ihimoyan's posts in his excellent blog.
  1. As usual, start Visual Studio and create a new smart device project.
  2. In Solution Explorer, right-click on References, and add the reference to System.Messaging component. We need this reference as we are using the Messaging classes later.
  3. Change the form property MinimizeBox to false, so that the use can close the application easily.
  4. Add a TextBox, 2 Buttons and a Label to the form, naming them txtSendMsg, btnSend, btnReceive and lblReceiveMsg respectively. The first button lets the user send the message in the textbox to a message queue. The second button receives a message from the queue. Even if the user closes the application, the stored messages in the queue remain intact and can be received when the application is restarted (however, a soft reset clears the queue).
  5. Next, we want to make the application self-contained, in that it will check for the presence of the MSMQ service and automatically installs it if it is not detected.
  6. Go to Microsoft Mobile Development Center and follow the link "Redistributable Server Components for Windows Mobile 5.0" to download the package. We need the msmq.ARM.CAB file in the package.
  7. After downloading, extract the msmq.ARM.CAB file (under msmq folder in the downloaded package). This is the cab file that installs the MSMQ service in the device.
  8. Back in Visual Studio, right-click on your project in Solution Explorer and add msmq.ARM.CAB to your project (use Add-> Existing Item...). Then click on msmq.ARM.CAB in Solution Explorer and change its "Copy to Output Directory" property to "Copy if newer". This will ensure that the cab file is copied over to the program folder in the device.
  9. In your form code, import the namespaces:
  10. using System.IO;
    using System.Messaging;
    using System.Runtime.InteropServices;
  11. Then within the form partial class, add the following declarations needed to P/Invoke the CreateProcess Win32 function. We need to call CreateProcess to install the cab.
  12. public class ProcessInfo
    {
      public IntPtr hProcess;
      public IntPtr hThread;
      public Int32 ProcessId;
      public Int32 ThreadId;
    }

    [DllImport("CoreDll.DLL", SetLastError = true)]
    private extern static
        int CreateProcess(String imageName,
        String cmdLine,
        IntPtr lpProcessAttributes,
        IntPtr lpThreadAttributes,
        Int32 boolInheritHandles,
        Int32 dwCreationFlags,
        IntPtr lpEnvironment,
        IntPtr lpszCurrentDir,
        IntPtr lpsiStartInfo,
        ProcessInfo pi);
    [DllImport("CoreDll.dll")]
    private extern static  Int32 GetLastError();

    [DllImport("CoreDll.dll")]
    private extern static
        Int32 GetExitCodeProcess(IntPtr hProcess, out Int32 exitcode);

    [DllImport("CoreDll.dll")]
    private extern static
         Int32 CloseHandle(IntPtr hProcess);

    [DllImport("CoreDll.dll")]
    private extern static
        IntPtr ActivateDevice(
          string lpszDevKey,
            Int32 dwClientInfo);

    [DllImport("CoreDll.dll")]
    private extern static
        Int32 WaitForSingleObject(IntPtr Handle,
        Int32 Wait);

    public static bool CreateProcess(String ExeName, String CmdLine)
    {
      Int32 INFINITE;
      unchecked { INFINITE = (int)0xFFFFFFFF; }
      ProcessInfo pi = new ProcessInfo();
      if (CreateProcess(ExeName, CmdLine, IntPtr.Zero, IntPtr.Zero,
          0, 0, IntPtr.Zero, IntPtr.Zero, IntPtr.Zero, pi) == 0)
      {
        return false;
      }
      WaitForSingleObject(pi.hProcess, INFINITE);
      Int32 exitCode;
      if (GetExitCodeProcess(pi.hProcess, out exitCode) == 0)
      {
        MessageBox.Show("Failure in GetExitCodeProcess");
        CloseHandle(pi.hThread);
        CloseHandle(pi.hProcess);
        return false;
      }
      CloseHandle(pi.hThread);
      CloseHandle(pi.hProcess);
      if (exitCode != 0)
        return false;
      else
        return true;
    }
  13. In the Form Load event handler (remember to generate the event handler stub by double-clicking on the form in design mode; similarly for the button click event handlers later), enter the following code which checks for and installs the MSMQ service.
  14. string MSMQ_ADM = @"\windows\msmqadm.exe";
    if (!CreateProcess(MSMQ_ADM, "status"))
    {
      if (!File.Exists(MSMQ_ADM) ||
         !File.Exists(@"\windows\msmqd.dll") ||
         !File.Exists(@"\windows\msmqrt.dll"))
      {
        //install msmq
        string _path = Path.GetDirectoryName(System.Reflection.Assembly.GetExecutingAssembly().GetName().CodeBase);
        string docname = _path + "\\msmq.ARM.CAB";
        CreateProcess("wceload.exe", "/noui \"" + _path + "\\msmq.ARM.CAB\"");
      }
      //check again
      if (!File.Exists(@"\windows\msmqadm.exe"))
      {
        MessageBox.Show("failed to install msmq cab");
        Close();
      }
      else //register, start and activate service
      {
        CreateProcess(MSMQ_ADM, "register cleanup");
        if (CreateProcess(MSMQ_ADM, "register install")
          && CreateProcess(MSMQ_ADM, "register")
          && CreateProcess(MSMQ_ADM, "enable binary"))
        {
          IntPtr handle = ActivateDevice(@"Drivers\BuiltIn\MSMQD", 0);//device registry key
          CloseHandle(handle);
          if (CreateProcess(MSMQ_ADM, "status")) return; //success
        }
        MessageBox.Show("failed to start msmq");
        Close();
      }
    }
  15. In the btnSend click event handler, enter the following code to send a message to the "testq" queue.
  16. if (txtSendMsg.Text.Trim() == "") return;
    string strDestQ = @".\private$\testq"; //queue name
    try
    {
      if (!MessageQueue.Exists(strDestQ))
        MessageQueue.Create(strDestQ);
      MessageQueue mq = new MessageQueue(strDestQ);
      mq.Send(txtSendMsg.Text);
      txtSendMsg.Text = "";
    }
    catch { }
  17. Finally, in the btnReceive click event handler, we will receive the frontmost message in the "testq" queue. Note that we are setting a simple timeout of 1 second (so the UI is not blocked for too long) in case there isn't any message in the queue.
  18. lblReceiveMsg.Text = ""; Refresh();
    MessageQueue mq = new MessageQueue(@".\private$\testq");
    //set formatter for deserializing message
    mq.Formatter = new XmlMessageFormatter(new Type[] { typeof(String) });
    try
    {
      Message messageReceived = mq.Receive(new TimeSpan(0, 0, 1));//timeout in 1s
      lblReceiveMsg.Text = (string)messageReceived.Body;
    }
    catch { lblReceiveMsg.Text = "- timeout -"; }
  19. We are done! Deploy and run. The first time you run, there is quite a long delay on form load, as the application is invoking wceload.exe to install the MSMQ service. When the form is loaded, type something in the textbox and click the Send button. Send a few more messages. Then click the Receive button a few times.
  20. Try closing and reopening the application and test if sent messages are still receivable. What about the effect of doing a soft reset?
In part 2, coming soon, we will send MSMQ messages across the network. Watch this space.

Categories: [MSMQ_] [Networking_] Tags: [] [] [] []
Read more...

Tuesday, January 03, 2006

- Create a SQL Mobile database (part 1)

I recently conducted a small poll and it turns out that SQL Mobile is the most requested topic (see ongoing voting results here). So in this tutorial, we will cover how to create a SQL Mobile database for the PDA or emulator.

Having seen the SQL Server Express (mentioned here), let's now look at SQL Mobile.

Being the successor of SQL Server CE 2.0, SQL Mobile is Microsoft's lightweight database server that has a small enough footprint (~1.5MB) to fit and run smoothly in a Pocket PC device. It is included in Visual Studio .NET 2005, so you don't have to install anything as a developer. For end users, SQL Mobile can be installed on the Pocket PC 2003, Windows Mobile 5.0, Smartphone 5.0 as well as Windows CE 5.0 platforms. Word has it that SQL Mobile will be pre-installed in the ROM of all new Windows Mobile devices, just like Compact Framework 2.0.

In terms of features, SQL Mobile offers transactional support, multi-user access, as well as synchronization and replication with back-end servers. In terms of competition, I'm not too sure if these few players are still fighting close: Sybase SQL Anywhere, Oracle Lite and IBM DB2 Everyplace.

Alright, let's dive in to create our very first SQL Mobile database.

  1. Start Visual Studio and create a new smart device project.
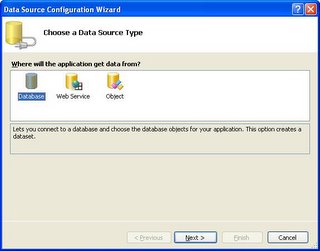
  2. Click Data in the menu and select "Add New Data Source..." to see the following dialog window.


  3. Select the Database icon (to indicate that you are creating a database) and click Next.
  4. In the next screen, click "New Connection..." to create a new database.
  5. In the the pop-up "Add Connection" window, click "Change..." to select a data source type. You should see the following:


  6. Select "Microsoft SQL Server Mobile Edition" as the Data Source and leave the Data provider as ".NET Framework Data Provider for SQL Server Mobile Edition". Click OK.
  7. Back at the "Add Connection" dialog, leave "My Computer" radiobutton selected, and then click "Create" to specify the filename of the SQL Mobile database. Enter "C:\FirstDB.sdf" for the filename and leave the other fields as they are (you can also specify the password here, but we leave it empty for convenience).


  8. Click OK. If prompted on the empty password, click Yes.
  9. You may now click "Test Connection" to check if the database is in order.
  10. Click OK. Back at the first dialog window, click Next, and click Yes to add the database file to your project. In the next screen, click Cancel as we are not using generated DataSets in this tutorial.
  11. You will notice that the FirstDB.sdf has been added to your project. Click on it and press F4 to check that its "Copy to Output Directory" property is "Copy if newer". This means that the file will be copied to the emulator if the emulator does not have a copy or have an older copy.
  12. Now, from the menu, click View-> Server Explorer. And in the Server Explorer pane, click the "Connect to Database" icon (2nd icon from the right; or move your mouse over each icon to see the tooltip).
  13. Click Browse and go to your project folder and select the FirstDB.sdf file. (Note that you can also create a database here, but care must be taken to add the created file to your project.)
  14. Test the connection and click OK.
  15. In the Server Explorer pane, expand the tree, right-click on Tables and select "Create Table". Enter the table name and create 2 columns for it, as shown below. Click on the image below to zoom in. (Note that the custid column has Identity set to true, so that this column's value for each record is auto-generated.)


  16. Click OK.
  17. Finally, run your program.
  18. There's nothing interesting in your form. However, open File Explorer and browse to the folder which contains the deployed files (at \Program Files\yourProjName). You should see a file with the name "FirstDB" there. The .sdf extension is not displayed. Click on this file to open it with Query Analyzer. Query Analyzer allows you to explore and manage SQL Mobile databases from within the PDA environment.
  19. In Query Analyzer, expand the tree under the Objects tab. You should see this:


  20. That's it! You have created a simple SQL Mobile database and transferred it to the emulator/device. Part 2, coming soon, will cover how to create a SQL Mobile database programmatically.
Categories: [Data Access_] Tags: [] [] []
Read more...

- Plasma or LCD TV?

Two years ago, the choice was clear. Just by comparing their response times, Plasma television sets won hands down, never mind the burn-ins. LCD TVs were simply too slow and left streaks of image blurs when viewing action movies. Fast forward to today. Have things changed?


The response time problem for LCD television is no longer an issue, with some models (in particular Sharp Aquos) even boasting a remarkable 4ms in their specifications. Although Plasma TVs still have more vivid colors, LCDs have surpassed them in terms of viewing angles. Some LCD models even have wider viewing angles than the typical 170 degrees that Plasmas offer. The Sony Bravia, for example, offers a 178-degree viewing angle.

LCD models have a longer lifespan of 65,000 hours, almost twice longer than that of Plasmas. To be fair, a few Plasmas also claim to have a 60k-hour lifespan, but these are the exception rather than the norm. Moreover, LCD TVs have replaceable fluorescent tubes, allowing for even longer extended operation. In contrast, there's nothing in Plasmas that can be easily and affordably replaced.


Finally, Plasma TVs are in general a lot heavier than LCD TVs, and Plasmas still suffer from burn-ins (images get permanently etched on the screen when left displayed for too long). Price-wise, both are on par. LCDs have the added advantage of being more energy efficient. So, all other things equal, I will definitely go for an LCD. Won't you?

Categories: [Blogging_] Tags: [] [] []
Read more...

Wednesday, December 28, 2005

- Co-founder of OpenNETCF mentions my blog!

I'm delighted to say that Neil Cowburn, co-founder of OpenNETCF.org, has put up a short plug for my compact framework tutorials blog. In his words, my blog is "very well worth a read if you are looking to get into Smart Device development."

Thanks, Neil! You made my day.

Categories: [Blogging_] Tags: [] [] []
Read more...

Thursday, December 15, 2005

- Accessing SQL Server Express from the emulator (or PDA)

This post talks about data access from the emulator (or actual device) to your PC. If you're just getting started on the .NET Compact Framework 2.0, you can read this to install the tools and this to write your first app.

In this tutorial, you learn how to let the emulator access a SQL Server Express database in your PC.

SQL Server 2005 Express edition is free and is installed together with most editions of Visual Studio 2005. As the successor of the very useful MSDE, SQL Server Express offers the equivalent, if not better, feature set of other free database servers (MySQL in particular). Compared to MSDE, SQL Server Express does not have the workload throttle restriction, thus giving better scalability, and allows a higher maximum database size of 4GB (an increase of 2GB). However, the new kid on the block always uses only a single CPU (even if the machine has multiple), and supports only replication subscriptions (it can't be a publisher). Still, it is extremely useful for basic development and exploration, in my opinion. It even comes with a management console (currently in Community Technology Preview, downloadable from a link on this page), something that its predecessor lacks.


Now, let's dive in! This step-by-step tutorial requires a sample database such as Northwind.mdf (which can be extracted from a download here). Although Northwind was created for SQL Server 2000, it can also be used in SQL Server 2005.

  1. You should have downloaded and extracted the Northwind sample database (download from here). Place both Northwind.mdf and Northwind.ldf files in a folder of your choice.
  2. Download and install the Management Studio Express from a link on this page. Start the Management Studio and login using Windows Authentication. Right-click on the first node in the treeview and click "Properties". In the dialog window, click "Security" on the left and select "SQL Server and Windows Authentication". This will allow connections to be made using SQL Server authentication.
  3. Next, still in Management Studio, expand the Security node in treeview, then expand Logins. In the main panel, right-click on "sa" and click "Properties". Change the password. Still within Properties dialog, click "Status" in the leftside panel, and enable the "sa" account. Click OK.
  4. Right-click on Databases, and attach the Northwind database.
  5. Next, we need to enable TCP/IP connections. Click Start-> All Programs-> SQL Server 2005-> Configuration Tools-> SQL Server Configuration Manager.
  6. Under "Protocols for SQLEXPRESS", ensure that "TCP/IP" is enabled. Double-click on TCP/IP, set Enabled to Yes, and under the "IP Addresses" tab, clear all the "TCP Dynamic Ports" entries (set them blank), and set TCP Port (under IP All) to 1433. We are fixing the port, which means SQL Browser service can be stopped (in fact, this is a security best practice). You may need to use another port number if you have other versions/instances of SQL Server running.
  7. Restart the SQL Express service to activate the new configurations.
  8. Start Visual Studio and create a new smart device project.
  9. Add a ComboBox called cboCountries to the form. Add the reference System.Data.SqlClient to your project. In code view, add the line "using System.Data.SqlClient;" near the top.
  10. In the Form_Load event handler, add the following code (replacing "192.1.2.3" with your IP address, and "yourPassword" with the password for your sa account:

  11. string sConnection = "Data Source=192.1.2.3,1433;Initial Catalog=Northwind;User ID=sa;Password=yourPassword;";
    string sSQL = "SELECT DISTINCT Country FROM Customers ORDER BY Country";
    SqlCommand comm = new SqlCommand(sSQL, new SqlConnection(sConnection));
    SqlDataReader dr = null;
    try
    {
      comm.Connection.Open();
      dr = comm.ExecuteReader();
      while (dr.Read())
        cboCountries.Items.Add(dr[0]);
    }
    catch (Exception e)
    {
      MessageBox.Show(e.Message);
      return;
    }
    dr.Close();
    comm.Connection.Close();

  12. Start the emulator and cradle it (see this post on cradling the emulator). Make sure that it can access the network.
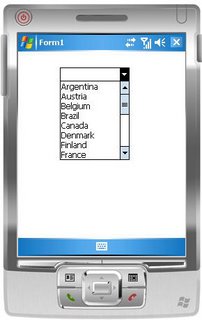
  13. Run your program. You should see the combo box populated with a list of countries extracted from the Northwind sample database.
What next? Learn how to create a SQL Server Mobile database here.

Categories: [Data Access_] [Networking_] Tags: [] [] []
Read more...

Wednesday, December 14, 2005

- Vote or suggest a tutorial topic

There are some compact framework tutorials that I'm thinking of writing, particularly in the area of SQL Server Mobile. However, I would like the readers of this blog to have a say. I therefore sincerely invite you to suggest or vote for a compact framework topic that you'd like to see most. To vote, click on one or more of the links in the frame below. To suggest a topic, simply type in the textbox and click the "Suggest" button. Thanks for your support.


The above "votebox" is written using ASP.NET 2.0. If you're interested in using it in your own websites/pages, kindly leave me a note (comment).

Categories: [Blogging_] Tags: [] []
Read more...

Wednesday, November 30, 2005

- Multithreaded Prime Number Generator

This is more of an intermediate topic. If you're just getting started on the .NET Compact Framework 2.0, you can read this to install the tools and this to write your first app.

In this tutorial, you learn how to write a multithreaded program that does some background processing and yet maintains a UI that's responsive to the user.

A multithreaded program is useful in that it gives the user a responsive UI and at the same time be productive in some background work, such as doing long calculations and IO. How do you decide when to start a thread? If the program is about to be engaged in some long processing, and you do not want to user to wait, then it's better to start a thread that works on the processing, while leaving the main UI thread running. This is known as threading. As usual, we will illustrate how to do threading with this simple step-by-step tutorial. We will write a program that keeps calculating prime numbers in the background, while leaving the UI responsive.
  1. Create a C# Windows Mobile 5.0 PPC Device Application project in Visual Studio .NET 2005.
  2. Change the form's MinimizeBox property to False (so that you can easily close it by clicking the OK at the top-right corner).
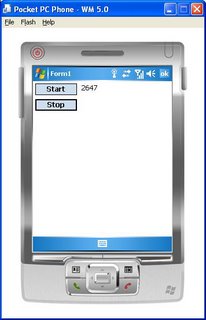
  3. Add 2 Button controls and a Label control. Call them btnStart, btnStop and label1. Set their Text properties to: "Start", "Stop" and [empty string] respectively.
  4. Go to the code view (press F7). Add the line "using System.Threading;" to the top, so that your code can use the Threading namespace.
  5. Add 2 private attributes to your partial class: private string textToShow, private bool runThread.
  6. Go back to design view (press Shift-F7). Double-click on the Start button and enter the following code to start a thread.
  7. Thread t = new Thread(new ThreadStart(WorkerThread));
    runThread = true;
    t.Start();
  8. In design view, double-click the Stop button and give it this code which informs the thread to stop:
  9. runThread = false;
  10. Back in design view, select the Form, and in the Properties panel, click on the Events button (the one with the thunderbolt image on it). Double-click on the Closing event. We will write one line of code for the closing event of the form, also to end the thread:
  11. runThread = false;
  12. Finally, add these 2 methods to the partial class:
  13. private void WorkerThread()
    {
      int n = 3;
      while (runThread)
      {
        bool isPrime = true;
        for (int f = 3; f <= Math.Sqrt(n); f += 2)
        {
          if (n % f == 0)
          {
            isPrime = false;
            break;
          }
        }
        if (isPrime)
        {
          textToShow = n.ToString();
          this.Invoke(new EventHandler(Update_label));
        }
        n += 2;
      }
    }
    private void Update_label(object sender, EventArgs e)
    {
      label1.Text = textToShow;
    }
  14. Compile, deploy to emulator and run. Test it by clicking the buttons. You will see that the prime numbers are being calculated and displayed, while leaving UI not blocked (i.e. still responsive).
  15. Notice that in the code, the label can't be updated directly from the worker thread. This is because the label object belongs to the main process thread and has to be synchronously updated through an Invoke call.
Do you like solving Sudoku puzzles? How about writing a Sudoku solver application for your PDA?

Categories: [Threading_] Tags: [] [] [] []
Read more...

Sunday, November 27, 2005

- Networking_: ping the emulator

This is more of an intermediate topic, which is especially useful if you're writing applications that requires networking. If you're just getting started on the .NET Compact Framework 2.0, you can read this to install the tools and this to write your first app.

Here's how you can ping your Windows Mobile 5.0 Pocket PC emulator:
  1. First, ensure that you do not "cradle" your emulator, which is already the case by default (so you don't have to do anything). If you want to know more on cradling emulators, see this.
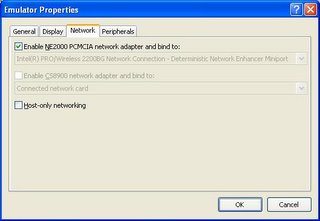
  2. Next, in the window that contains the emulated Pocket PC, click File-> Configure. You should see the "Emulator Properties" dialog box. Under the Network tab, check the checkbox "Enable NE2000...". This will bind the emulator's network adapter to your host PC's network. (If you're familiar with using Virtual PC, this is exactly the same as binding the network adapter in a Virtual Machine to the host PC's network).
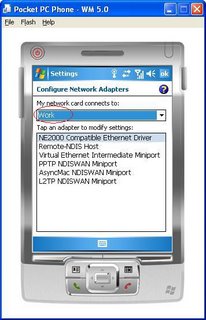
  3. Within the emulator, click Start-> Settings-> Connections (tab)-> Network Cards. Check that the card connects to "Work".
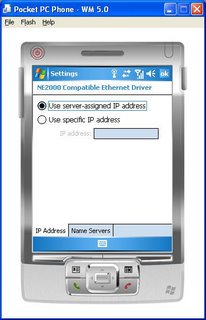
  4. Then click on the NE2000 driver and ensure that "Use server-assigned IP address" is selected (this is assuming that you have a DHCP server in your network; if not, you need to specify a valid IP address within the same subnet as your host PC, and also configure the Name Servers). Click OK a few times to close the dialog boxes.
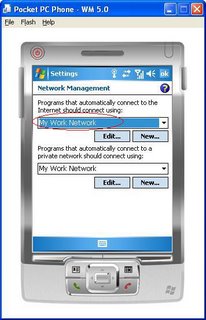
  5. Still within the emulator, click Start-> Settings-> Connections (tab)-> Connections-> Advanced (tab), click "Select Networks" button, and change the first dropdown to "My Work Network". Click OK.
  6. Soft reset the emulator (in the window containing the emulator, click File-> Reset-> Soft).
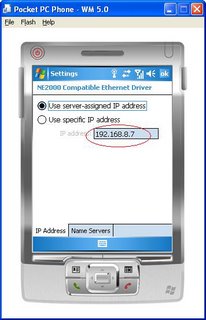
  7. To find out the IP address assigned to the emulator, click Start-> Settings-> Connections (tab)-> Network Cards, and click on the NE2000 driver.
  8. You can now ping the emulator from your host PC.
We will explore writing networking applications some time soon. (In fact, you have already written a browser app, which actually depends on ActiveSync as a virtual router to connect to the Internet, but the problem is that by doing so, connection initiation can only be from emulator to the network, which means you can neither ping nor connect to the emulator from outside.)

Categories: [Networking_] Tags: [] [] []
Read more...

Friday, November 25, 2005

- Getting started_: new features in .NET Compact Framework 2.0

You have seen the introduction to the .NET Compact Framework. This post talks more on the latest version 2.0 of the framework.

I shall not delve deep into the previous version of the .NET Compact Framework, but it suffices to say that it was working well, and that version 2.0 improves on it a lot more. It's not hard to tell, looking at the new features the .NET Compact Framework 2.0 offers beyond it's older cousin:
  • Additional Windows Forms features and controls
  • Anonymous methods
  • COM Interoperability (RCW)
  • Cryptographic support for MD5, SHA1, DES, 3DES, RSA
  • DataSet improvements
  • Direct3D and DirectDraw Mobile
  • Generics
  • Imrpoved threading
  • IPv6 support
  • Messsage queueing (MSMQ)
  • Networking support for NTLM, Negotiate and Kerberos authentication protocols
  • Partial classes
  • Pocket Outlook managed library
  • RegistryKey class
  • Serial port support
  • Simplified asynchronous Web Services programming model
  • SOAP 1.2 support
  • Telephony managed library
  • XML improvements and support for XmlSerializer, Xpath, Schema
I'm interested in the ones that are boldfaced. Let's delve into them some time.

Categories: [Getting started_] Tags: [] [] []
Read more...

- Getting started_: what is the .NET Compact Framework

You have been using the Microsoft .NET Compact Framework (let's call it Compact Framework for short) to write your first Pocket PC application, a browser app and even a Sudoku solver app! Let's look at what the Compact Framework really is about.

As the Compact Framework is a subset of the .NET Framework, let's look at the bigger .NET Framework first.

Think of the .NET Framework as the Microsoft equivalent of the Java Software Development Kit. Just like Java, the .NET Framework provides the developer a set of APIs with which he/she writes code that are executed in a "virtual machine". In .NET lingo, such code is called managed code, and the "virtual machine" is known as Common Language Runtime (CLR). In short, the CLR manages the execution of the code, and does all the resource management, code access security, threading, type safety, and all necessary plumbing, so that you as the programmer can churn out code more productively, focusing on the all-important business logic, and without having to worry too much about the nitty gritty.

As for the Compact Framework, it does to Windows CE devices what its grand uncle .NET Framework does to desktops and servers. Think of it as a platform for developing managed code to be run on mobile devices.

The Compact Framework is currently in version 2.0. Here's a list of what are the new features version 2.0 offers.

Categories: [Getting started_] Tags: [] [] []
Read more...