New to compact framework tutorials? Learn to write your first compact framework application here.
Zac Efron - Hairspray star and Mythbusters' Kari Byron at Celebrity Treat. Check out income and career information in Singapore.

Wednesday, November 30, 2005

- Multithreaded Prime Number Generator

This is more of an intermediate topic. If you're just getting started on the .NET Compact Framework 2.0, you can read this to install the tools and this to write your first app.

In this tutorial, you learn how to write a multithreaded program that does some background processing and yet maintains a UI that's responsive to the user.

A multithreaded program is useful in that it gives the user a responsive UI and at the same time be productive in some background work, such as doing long calculations and IO. How do you decide when to start a thread? If the program is about to be engaged in some long processing, and you do not want to user to wait, then it's better to start a thread that works on the processing, while leaving the main UI thread running. This is known as threading. 
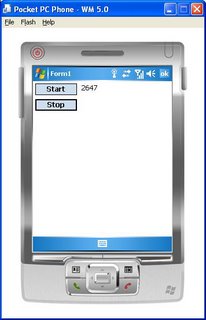
As usual, we will illustrate how to do threading with this simple step-by-step tutorial. We will write a program that keeps calculating prime numbers in the background, while leaving the UI responsive.
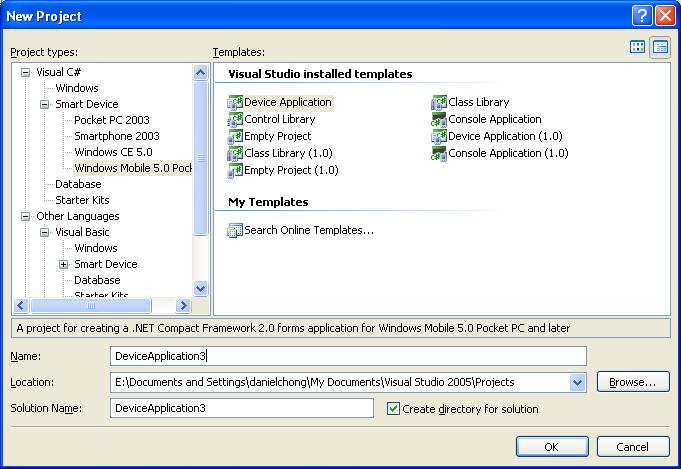
  1. Create a C# Windows Mobile 5.0 PPC Device Application project in Visual Studio .NET 2005.
  2. Change the form's MinimizeBox property to False (so that you can easily close it by clicking the OK at the top-right corner).
  3. Add 2 Button controls and a Label control. Call them btnStart, btnStop and label1. Set their Text properties to: "Start", "Stop" and [empty string] respectively.
  4. Go to the code view (press F7). Add the line "using System.Threading;" to the top, so that your code can use the Threading namespace.
  5. Add 2 private attributes to your partial class: private string textToShow, private bool runThread.
  6. Go back to design view (press Shift-F7). Double-click on the Start button and enter the following code to start a thread.
  7. Thread t = new Thread(new ThreadStart(WorkerThread));
    runThread = true;
    t.Start();
  8. In design view, double-click the Stop button and give it this code which informs the thread to stop:
  9. runThread = false;
  10. Back in design view, select the Form, and in the Properties panel, click on the Events button (the one with the thunderbolt image on it). Double-click on the Closing event. We will write one line of code for the closing event of the form, also to end the thread:
  11. runThread = false;
  12. Finally, add these 2 methods to the partial class:
  13. private void WorkerThread()
    {
      int n = 3;
      while (runThread)
      {
        bool isPrime = true;
        for (int f = 3; f <= Math.Sqrt(n); f += 2)
        {
          if (n % f == 0)
          {
            isPrime = false;
            break;
          }
        }
        if (isPrime)
        {
          textToShow = n.ToString();
          this.Invoke(new EventHandler(Update_label));
        }
        n += 2;
      }
    }
    private void Update_label(object sender, EventArgs e)
    {
      label1.Text = textToShow;
    }
  14. Compile, deploy to emulator and run. Test it by clicking the buttons. You will see that the prime numbers are being calculated and displayed, while leaving UI not blocked (i.e. still responsive).
  15. Notice that in the code, the label can't be updated directly from the worker thread. This is because the label object belongs to the main process thread and has to be synchronously updated through an Invoke call.
Do you like solving Sudoku puzzles? How about writing a Sudoku solver application for your PDA?

Categories: [Threading_] Tags: [] [] [] []
Read more...

Sunday, November 27, 2005

- Networking_: ping the emulator

This is more of an intermediate topic, which is especially useful if you're writing applications that requires networking. If you're just getting started on the .NET Compact Framework 2.0, you can read this to install the tools and this to write your first app.

Here's how you can ping your Windows Mobile 5.0 Pocket PC emulator:
  1. First, ensure that you do not "cradle" your emulator, which is already the case by default (so you don't have to do anything). If you want to know more on cradling emulators, see this.
  2. Next, in the window that contains the emulated Pocket PC, click File-> Configure. You should see the "Emulator Properties" dialog box. Under the Network tab, check the checkbox "Enable NE2000...". This will bind the emulator's network adapter to your host PC's network. (If you're familiar with using Virtual PC, this is exactly the same as binding the network adapter in a Virtual Machine to the host PC's network).
  3. Within the emulator, click Start-> Settings-> Connections (tab)-> Network Cards. Check that the card connects to "Work".
  4. Then click on the NE2000 driver and ensure that "Use server-assigned IP address" is selected (this is assuming that you have a DHCP server in your network; if not, you need to specify a valid IP address within the same subnet as your host PC, and also configure the Name Servers). Click OK a few times to close the dialog boxes.
  5. Still within the emulator, click Start-> Settings-> Connections (tab)-> Connections-> Advanced (tab), click "Select Networks" button, and change the first dropdown to "My Work Network". Click OK.
  6. Soft reset the emulator (in the window containing the emulator, click File-> Reset-> Soft).
  7. To find out the IP address assigned to the emulator, click Start-> Settings-> Connections (tab)-> Network Cards, and click on the NE2000 driver.
  8. You can now ping the emulator from your host PC.
We will explore writing networking applications some time soon. (In fact, you have already written a browser app, which actually depends on ActiveSync as a virtual router to connect to the Internet, but the problem is that by doing so, connection initiation can only be from emulator to the network, which means you can neither ping nor connect to the emulator from outside.)

Categories: [Networking_] Tags: [] [] []
Read more...

Friday, November 25, 2005

- Getting started_: new features in .NET Compact Framework 2.0

You have seen the introduction to the .NET Compact Framework. This post talks more on the latest version 2.0 of the framework.

I shall not delve deep into the previous version of the .NET Compact Framework, but it suffices to say that it was working well, and that version 2.0 improves on it a lot more. It's not hard to tell, looking at the new features the .NET Compact Framework 2.0 offers beyond it's older cousin:
  • Additional Windows Forms features and controls
  • Anonymous methods
  • COM Interoperability (RCW)
  • Cryptographic support for MD5, SHA1, DES, 3DES, RSA
  • DataSet improvements
  • Direct3D and DirectDraw Mobile
  • Generics
  • Imrpoved threading
  • IPv6 support
  • Messsage queueing (MSMQ)
  • Networking support for NTLM, Negotiate and Kerberos authentication protocols
  • Partial classes
  • Pocket Outlook managed library
  • RegistryKey class
  • Serial port support
  • Simplified asynchronous Web Services programming model
  • SOAP 1.2 support
  • Telephony managed library
  • XML improvements and support for XmlSerializer, Xpath, Schema
I'm interested in the ones that are boldfaced. Let's delve into them some time.

Categories: [Getting started_] Tags: [] [] []
Read more...

- Getting started_: what is the .NET Compact Framework

You have been using the Microsoft .NET Compact Framework (let's call it Compact Framework for short) to write your first Pocket PC application, a browser app and even a Sudoku solver app! Let's look at what the Compact Framework really is about.

As the Compact Framework is a subset of the .NET Framework, let's look at the bigger .NET Framework first.

Think of the .NET Framework as the Microsoft equivalent of the Java Software Development Kit. Just like Java, the .NET Framework provides the developer a set of APIs with which he/she writes code that are executed in a "virtual machine". In .NET lingo, such code is called managed code, and the "virtual machine" is known as Common Language Runtime (CLR). In short, the CLR manages the execution of the code, and does all the resource management, code access security, threading, type safety, and all necessary plumbing, so that you as the programmer can churn out code more productively, focusing on the all-important business logic, and without having to worry too much about the nitty gritty.

As for the Compact Framework, it does to Windows CE devices what its grand uncle .NET Framework does to desktops and servers. Think of it as a platform for developing managed code to be run on mobile devices.

The Compact Framework is currently in version 2.0. Here's a list of what are the new features version 2.0 offers.

Categories: [Getting started_] Tags: [] [] []
Read more...

Thursday, November 24, 2005

- Blogging_: categories categories categories in Blogger blogs

You can have categories in your blog in 5 minutes flat!

Looking to include categories in your Blogger blog? Check out these blogs that use my netcf2 hack:
...
Pop Culture Jeblog
an entertainment blog
reviews on music, DVDs, books...

Freshblog (mentions), Ubi Dubium Ibi Libertas (mentions), Brown Rab Girl Fish, Great Britain, not little England (mentions), 7CM Internet Marketing Blog (mentions), Gavin Corder's Blog, Pike Mot Samtiden, This is not my country, Tempus Fugit (mentions), Capital Defense Weekly, Em duas línguas (mentions), Graça Morais, par Lui, avec Lui et en Lui , For Myself and Strangers , idei de imprumut , A Rare View, Okazu, the truth hurts, Amateur Gardening, Forest Law, mckib•in•nihon, owsblog and many more - see my technorati ranking and google search.

Many bloggers have noticed that categories are not supported in Blogger. If you've used them before, you'll know categories are a good thing to have. In fact, many other blogging sites and popular blogware such as WordPress actually allow bloggers to create/manage categories and classify all their posts under them.

It is possible to have categories in your Blogger blog. A simple search (in Google or Blogger) shows that there are hacks to do it (see my previous post on which are the more popular techniques). However, these hacks are a little complicated for some, especially if you only need a basic category function. And most of these hacks rely on external sites to do the tagging, such as Technorati and del.icio.us.


If all you need is a simple yet effective categorizing feature in your blog, here's how you can do it in 5 minutes flat. I even wrote a script generator, so you can easily generate the code to add to your sidebar template (very much like adding new links or Adsense code). In the spirit of clarity, I rehash what I posted previously here:
  1. Visit the script generator here.
  2. Enter your blog URL in the first textbox. Leave out the "http://", and very importantly, leave out the "www." as well (this is because www.yourblog.blogspot.com is actually an alias to the actual yourblog.blogspot.com)
  3. Next, enter your first category in the next textbox.
  4. To add one more category, click on the link "click this to add one more category" and enter it in the textbox that appears. Repeat this step, if necessary, to add more categories.
  5. Finally, click the link "Generate code" to generate the code. Click on the code and press Ctrl-C to copy the code.
  6. Go to your blog Template and look for the section called sidebar. Then paste the copied code at the place where you want the categories to appear.
  7. Save your template and republish your blog.
  8. Note that this technique (or hack) actually makes use of Blogger Search to categorize your posts. Thus it is important that you name the categories appropriately so that the search results return the correct posts. The category name should contain keywords that appear in your post. One extremely effective way, which I use, is to either (1) prefix every post's title with its category name, for example, "Blogging: categories categories...", or (2) ensure that your post contains the category name somewhere.
  9. (You may need to republish your entire blog sometimes, to let Blogger index your pages.) If you find that Blogger Search is not searching your blog, check that you have activated the "Site Feed" and "Notify Weblogs.com" features for your blog (under Settings), and that your template does not contain a meta tag to stop the search bots from indexing your blog.
  10. You are done! If you like my technique/hack, please support this blog by making a small donation via PayPal (click the icon at the top left of this page). Any amount is appreciated. Thank you.
Categories: [Blogging_] Tags: [] []
Read more...

Wednesday, November 23, 2005

- Blogging_: Blogger Search - Another Method - Freshblog

Happy to note that my categories method has been mentioned at FreshBlog.
You can initiate a blogger-search by hard-coding the links into your sidebar too (cosmos search stylee) and then inserting the relevant keywords into all your post titles. What with this being Freshblog, and all, the results (surprise, surprise) will stand in for categories. ... Daniel has written a code-generator that will build the sidebar menu for you. Cool!
Thanks to John for the compliments.

See this post of mine on exactly how to have categories in your blog.

Categories: [Blogging_] Tags: [] []
Read more...

- PDAs_: best Windows Mobile 5.0 non-phone PDA

In my opinion, the Dell Axim X51v PDA wins hands down (as of this writing) in the non-phone Windows Mobile 5.0 PDA category. First, it runs the all-powerful 624MHz Intel PXA270 CPU and comes with 256MB of ROM and 64MB of RAM. Now, don't let the low RAM mislead you. Starting with Windows Mobile 5.0, which X51v is running, all data are stored in the ROM. This means that your programs, documents and data files are all stored in permanent storage (called "persistent memory"). Even with the battery dead, you will not lose a single byte of your precious data. As for the RAM, it is used purely for running applications (e.g. for "allocating memory to objects").

Next is its 480x640 VGA display with 65,536 colors. Although VGA displays are not the mainstream yet, certain applications support it. And when they do, it looks GREAT. The 3.7-inch screen size is the same or larger than most other PDAs. Moreover, with an Intel 2700G graphics accelerator (something not common), the display speed and refresh rate are hard to beat.

Weighing a tad heavy at 6.2 ounce (176g), X51v comes with standard connectivity - 802.11b, BlueTooth and IrDA support - as well as CompactFlash II and SDIO Now! slots for I/O. Pretty standard fare here, except for the additional but optional VGA-Out support (good for presentations).

For all the cool features it has, the Dell Axim X51v PDA is priced extremely competitively. Good work, Dell!

Categories: [PDAs_] Tags: [] [] [] []
Read more...

- Controls_: using the soft keys for a Sudoku solver app

Well, maybe the first app and even the browser app are too easy. (If you're just getting started with Compact Framework or the tools, see this.) Let's see if things get better...

One of the most important new features in Windows Mobile 5.0 is the Soft Keys. Instead of using a traditional menu (which is still possible), most apps will now use just the left soft key and the right soft key at the bottom of the screen. Like in cell phones, the functions of the soft keys change according to the context (i.e. it is "app-dependent", and "form-dependent").


Sudoku puzzles are all the rage these days. According to this there are 5,472,730,538 unique Sudoku puzzles, and this claims that Sudoku puzzles are NP-complete. These all mean you'll have endless fun with Sudoku. So today, to make it more fun, we're going to write a Sudoku solver app. It uses a brute force algorithm, so any solvable Sudoku puzzle can be solved using this app.
  1. Create a new C# Windows Mobile 5.0 PPC Device Application project in Visual Studio .NET 2005.
  2. At the bottom of the form is a blue bar. That is the menu. To add the left soft key, click on the left side of the blue bar and type "Default". Similarly for the right soft key, click on the right side and type "Solve It!"
  3. Add a TextBox control to the form. Change its Multiline property to True. When the app runs, the user will enter the puzzle in the textbox. Dock the textbox so that it always fills the entire form, by changing its Dock property to Fill (see also this on docking and anchoring). Change its Font property to use Courier New Bold 12pt.
  4. Change other properties (see previous posts) as needed to get this:
  5. Double-click on "Default" to jump to the event handler of the left soft key. We want to set the textbox to contain a default puzzle when the user clicks on this soft key. Type the following code in the event handler method:
  6. textBox1.Text=
    @"800017060
    407065000
    905080310
    300200001
    070000040
    500004008
    086070504
    000540206
    050620009";
  7. Next, the logic of the solver. Press Shift-F7 to go back to design view and double-click on the "Solve It!" right soft key. Type the following in the event handler:
  8. if (textBox1.Text.Trim() == "") return;
    string s = textBox1.Text.Replace(" ", "").Replace("\t", "");
    char[] tA = s.Replace("\r", "").Replace("\n", "").ToCharArray();
    textBox1.Text = "";
    int[] A = new int[tA.Length];
    for (int i = 0; i < tA.Length; i++) A[i] = (int)(tA[i] - '0');
    R(A);
  9. Copy the following 2 methods and paste into your code (below the previous event handler method):
  10. private void R(int[] A)
    {
      for (int i = 0; i <= 80; i++)
      {
        if (A[i] > 0) continue;
        ArrayList aL = new ArrayList(new int[] { 1, 2, 3, 4, 5, 6, 7, 8, 9 });
        for (int j = 0; j <= 80; j++)
          if (j / 9 == i / 9 || j % 9 == i % 9 ||
          (j / 27 == i / 27 && (j % 9) / 3 == (i % 9) / 3))
            aL.Remove(A[j]);
        foreach (int k in aL) { A[i] = k; R(A); }
        A[i] = 0; return;
      }
      print(A);
    }
    private void print(int[] A)
    {
      string s = "";
      for (int i = 0; i <= 80; i++)
      {
        s += A[i] + " ";
        if (i % 3 == 2) s += " ";
        if (i % 9 == 8) s += "\r\n";
        if (i % 27 == 26) s += "\r\n";
      }
      textBox1.Text = s;
    }
  11. Because ArrayList is used in the code, add a line right at the top of your code to include the Collections namespace:
  12. using System.Collections;
  13. To tabify/beautify your code, click Edit-> Advanced-> Format Document in your code view.
  14. Finally, click Ctrl-F5 to deploy and run. To test, click on Default and click Solve It! You may also type in your own Sudoku puzzle (enter all the numbers in 9 rows, with a zero for each "space" to solve, as illustrated in the default puzzle).
Ever wondered what really is the Microsoft .NET Compact Framework? Read this.

Or write a Multithreaded Prime Number Generator for your PDA!

Categories: [Controls_] Tags: [] [] []
Read more...

Tuesday, November 22, 2005

- Blogging_: generate categories for your blog

Updated Nov 24: see my latest post with step-by-step instructions on creating categories.

Following my previous post on how to create categories in Blogger easily (see also FreshBlog's posts on other methods here and here) , I wrote some JavaScript code to generate code for anyone who's interested to add categories to his/her sidebar template. Here's how to use it:
  1. First, decide what are the category names you want. These names must be searchable by the Blogger search engine. My way to ensure this is to "tag" every of my posts by prefixing the category name in its title. For example, this particular post has "Blogging" as the title prefix.
  2. Next, visit this page at my other site (Blogger doesn't allow me to embed the JavaScript in a post, so I have to upload my script generator elsewhere).
  3. In the first textbox, enter the URL of your blog. For my case (as an example), it will be netcf2.blogspot.com


  4. There's a link beside the word Categories. Click on it to add more textboxes (as many as the number of categories you intend to have). Then type in the category names in the textboxes.
  5. Finally, click Generate code. And copy the generated code to your Blogger template code (place it in the sidebar). This is similar to adding Google Adsense code.


Categories: [Blogging_] Tags: [] []
Read more...

- Getting started_: using the emulator

After installing the tools and writing your first app, here are some tips on using the Windows Mobile emulators.
  1. There are 2 ways (at least) to start an emulator. One is to create a new Windows Mobile device application, write a simple program, and deploy to an emulator. The other way is to launch the Device Emulator Manager (in Visual Studio .NET 2005, click Tools-> Device Emulator Manager), right-click on one of the emulators in the list, and click Connect.
  2. My favourite emulator is Windows Mobile 5.0 Pocket PC Phone Emulator. It does what a normal Pocket PC can do, and more. We'll explore the phone features in another post.
  3. You can "cradle" an emulator. This is akin to physically slotting an actual Pocket PC PDA into its cradle, except that you are doing it to a virtual PDA (i.e. the emulator). To cradle a running emulator, right-click on the item that corresponds to the emulator in the Device Emulator Manager (i.e. if you're running the Windows Mobile 5.0 PPC Phone Emulator, right-click on "Windows Mobile... Phone Emulator"), and click Cradle. The ActiveSync icon in your systray should start spinning, indicating that synchronization is in progress. If this is the first time you are cradling the emulator, a wizard will pop up. Just go through it as you would with any other wizards (I'd uncheck all the checkboxes).
  4. Turning off the emulator is easy, just click the close button (the cross at the top right). HOWEVER, always remember to Uncradle the emulator first. When prompted to save state, click Yes. (If you forget, which I sometimes do, you'll find that ActiveSync is unable to detect the emulator. In this case, do a soft-reset by clicking File-> Reset-> Soft.)
Now, let's write your second app, which is a BROWSER!

Categories: [Getting started_] Tags: [] [] []
Read more...

- Controls_: browser in your app

After writing your first app using the Microsoft .NET Compact Framework 2.0 and deploying to a Windows Mobile 5.0 Pocket PC emulator (and tips on using the Windows Mobile emulators), you are now ready to write your second app.

One of the new conrols in netcf2 is the browser control. The example here shows you how to create a simple browser app for your Pocket PC.
  1. First, start Visual Studio .NET 2005.
  2. If you're using an emulator, ensure that it is connected to the network. There are 2 methods to do this. Click Tools-> Device Emulator Manager to start the Device Emulator Manager, right-click on Windows Mobile 5.0 Pocket PC Phone Emulator (or another WM5 emulator) and click Connect. The emulator will start up. Now, in the Device Emulator Manager again, right-click on the same item and click Cradle (see pic). This will connect the emulated PDA to your PC via ActiveSync. If it is the first time you're doing this, just go through the wizard on what to synchronize (I'd uncheck everything). Your emulator should now be connected to the network via your PC. The second method is to bind the network adaptor in the emulator to the networking in your PC. In the emulator program, click File-> Configure, under the Network tab, check the first checkbox to enable the network adapter.
  3. Do a quick check by opening Internet Explorer in the emulator and browsing to a website such as www.google.com (yes, there's already a browser, so why are we writing another browser?!)
  4. Next, as in previous examples, create a Windows Mobile 5.0 Device Application project. As usual, change the Minimize Box property of the form to False.
  5. From the toolbox, drag the WebBrowser control to the form. By default, the WebBrowser control is docked to the form. This means that it fills up the entire form all the time, regardless of the form's orientation (portrait or landscape). This is a nice behavior, but we'll anchor the control instead. To do this, we first undock the control: with the control selected, you should see a little triangle. Click on it to open a "Smart Task menu", and select Undock in parent container.
  6. Still with the WebBrowser control selected, go to the Properties panel (shortcut key: F4) and change its Anchor property such that the control is anchored Bottom, Left, Right to the form (see pic below). With anchoring, the control will always maintain the same distance from the sides of the form to which it is anchored (bottom, left & right in our case here).
  7. Drag and resize the WebBrowser control such that it fills about two-thirds of the form, leaving a gap at the top. Right-click on the form (or on the little lock symbol) and select Rotate Right. You now see the landscape mode at design time! Notice that the WebBrowser control still maintains the same distance from bottom, left & right (if it fills up the form, you should decrease the height of the control). Rotate Left the form to revert to portrait mode.
  8. Drag a TextBox control and a Button control to the form. Change the Text property of each to have this:
  9. Finally, double-click on the Go! button and add this line of code to its click event handler:
  10. Uri u = new Uri(textBox1.Text); webBrowser1.Navigate(u);
  11. Click Ctrl-F5 to run. Enter a valid URL and click Go!. To see the anchoring in action, click on the calendar button in the emulator (circled in red in pic below) to change to landscape orientation.
Where do we go from here? Let's write something more complicated, like a Sudoku solver! And maybe check out the Dell Axim X51v.

Categories: [Controls_] Tags: [] [] []
Read more...

- Blogging_: enable categories in your blog

Updated Nov 24: see my latest post with step-by-step instructions on creating categories.

Like many others, I was surprised that Blogger does not support categories. Did a search and found many cool hacks on tagging and creating pseudo categories, such as Zoundry's custom tags, FreshBlog's 3 methods and Billy Joe Jim Bob's multi-blog method. Still, I thought things could be simpler. This is my method:
  • Tag every post with a category by prefixing its title with the category name, e.g. "Blogging: ...", "Getting started: ..."
  • Modify the template code to include a Categories section. Here's an example based on what I have (as you can see in my sidebar, I have a few categories currently; for clarity, this example shows just one category):
<h2 class="sidebar-title">Categories</h2>
<ul>
<li><a href="http://search.blogger.com/?ie=UTF-8
&ui=blg&bl_url=netcf2.blogspot.com&x=0&y=0&scoring=d&
as_q=getting%20started">Getting started</a></li>
</ul>
(Note: the whole <li>...</li> should be on one line, and you should replace netcf2.blogspot.com with your blog url, as well as the value for the as_q parameter.)


When a user clicks on a category link, a blogger search is invoked, searching for posts that contain the category name within this blog. As you may have guessed, the prefixes in the titles make searching more effective. For even better search results, you can have more unique category names (than mine).

Categories: [Blogging_] Tags: [] []
Read more...

Monday, November 21, 2005

- Getting started_: your first app

After installing the tools, we are ready to roll.
  1. Start Visual Studio 2005.
  2. Click File-> New-> Project.
  3. In the "Project types" panel on the left, under Visual C# (yes, we're using C# here), expand Smart Device, and select Windows Mobile 5.0 Pocket PC (if you do not see this, check that you install the SDK). In the "Templates" panel, select Device Application.
  4. Give your project a suitable name, specify a location to save your files, and click OK.
  5. You should see a PDA skin in the design view. Click on it and press F4 to go to the properties panel. Change the Text property to "My First App". Also, change the Minimize Box property to False. Notice that the little cross at the top-right corner of your form is now an ok button. This ensures that the application is closed when the user clicks on the ok button (as opposed to being minimized and still running in the background).
  6. Next, drag a Label control and a Button control to the form. Change the Text property of the label to an empty string, and the Text property of the button to "Click Me!"
  7. Now, double-click on the button that you just added. You should see the Code view.
  8. Type the following line in the button1_Click method:
  9. label1.Text = "Hello World!";
  10. Click Ctrl-F5 to build the application and deploy. When prompted on where to deploy to, select Windows Mobile 5.0 Pocket PC Phone Emulator (or if you prefer, any WM5 Pocket PC emulator, but the phone is the best in my opinion!)
  11. You should see the emulator running your first app. Click on the button and voila! (To close, click the ok button at the top right to close your app, and close the emulator. When asked to save state, click Yes.)
Where to go next? See this for some tips when using the emulator, and this for your second mini project on writing your own browser app!

Categories: [Getting started_] Tags: [] [] []
Read more...

Sunday, November 20, 2005

- Getting started_: install the tools

Welcome to this blog on the Microsoft .NET Compact Framework 2.0. You can look forward to lots of simple examples to kick start your development.
  1. Install Visual Studio .NET 2005 (Standard, Professional or Team System edition). I am using the Professional edition.
  2. Install the latest ActiveSync. As of this writing, the version is 4.1, downloadable here. This version resolves some USB synchronization problems in the previous version.
  3. Next, install the Windows Mobile 5.0 SDK, downloadable from a link on this page.
  4. And you're done!
Let's write our first application.


Categories: [Getting started_] Tags: [] [] []
Read more...